WOULDN'T IT BE GREAT TO BUILD YOUR OWN HOME RECORDING STUDIO?
WHETHER IT'S FOR A DEMO, TO SHARE WITH FRIENDS, OR SIMPLY FOR THE THRILL OF HEARING YOURSELF PERFORM, AT LEAST ADMIT TO YOURSELF THAT THE IDEA OF RECORDING YOUR MUSICAL PERFORMANCES IS INTRIGUING.
THE PROBLEM IS THAT IT'S AN INTIMIDATING HOBBY TO GET STARTED IN. BETWEEN THE HEAVY DOSES OF IMPRESSIVE SOUNDING JARGON AND THE INTERACTION OF ALL THE MANY DIFFERENT COMPONENTS, IT'S EASY TO BE DISCOURAGED.
I'LL EXPLAIN THE BASICS OF EACH STEP ALONG THE WAY. TOGETHER WE'LL CREATE A BASIC HOME RECORDING SETUP THAT'S RIGHT FOR YOU.
ALL YOU NEED IS A PASSION FOR MUSIC, SOME BASIC RECORDING EQUIPMENT, AND A WILLINGNESS TO LEARN.
MUSICIANS -- FROM SMOOTH FINGER-PICKERS & ELECTRIC BLUES-LICKERS TO 80S METAL FACE MELTERS... ONE THING UNITES US ALL. THE DESIRE TO EXPRESS EMOTION THROUGH THE EXPERIENCE OF SOUND.
FOR ALL OF OUR WORDS AND EXPRESSIONS, THEY OFTEN PROVE TO BE INADEQUATE WHEN COMPARED TO THE ELEGANCE OF MUSIC.
YOU HAVE A SYMPHONY INSIDE, READY TO BE UNLEASHED.
WOULDN'T IT BE GREAT TO BUILD YOUR OWN HOME RECORDING STUDIO?
BASIC STUDIO BUILDER
The Basic Studio Builder will be your step by step guide to creating your very own Basic Home Recording Studio. Your home recording studio will be a collection of various pieces of hardware and software. The beauty is that it will be custom made for your needs.
Each step in the Basic Studio Builder will describe a different aspect of the home studio. For more information on any step click on the hyperlinks within or check the navigation sidebar.
Following each description will be a 'Basic Studio Builder Rating' to recommend how much of your budget to dedicate to the gear in that section. Here is the definition of each rating:
$ - A good place to save some money.
$$ - Spend a bit more and buy some additional quality.
$$$ - Splurge here knowing that you'll be happier in the long run.
$$ - Spend a bit more and buy some additional quality.
$$$ - Splurge here knowing that you'll be happier in the long run.
This basic setup will get you started with the least amount of gear and equipment. If you're not quite sure if you want to make an investment in this hobby yet, then this is the place to start.
Still feeling anxious about getting started? Maybe an overall explanation of Recording Basis will help put your mind at ease. After all, this is supposed to be fun!
Now it's time to kick the tires and light the fires. Yeeehaw!!
Choose a Location
We start with choosing a location for your home studio. The location is important because this will be your sanctuary, your shelter from the storm of your everyday life.
This should be a place where you can be reasonably isolated. I would recommend using a spare bedroom or office as a dedicated space.
Try to setup your studio in a separate part of your home if possible, rather than double booking a current room (i.e. your bedroom or living room), so that you can focus on your music free from distraction.
A basement area would be ideal since you will be able to eliminate some of the ambient noises of the neighborhood around you.
Most importantly, choose a location where you feel comfortable and can let your creativity freely flow.
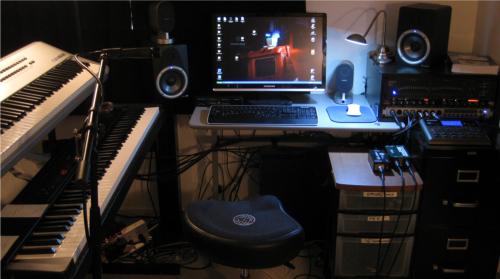
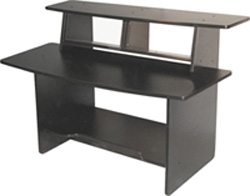
 Get Furnished
Having a smart layout makes all the difference in the world.All of your gear should be laid out so you can enter the room and get right to work.
 Nothing will scare off a great idea faster than searching for cables, mics, FX pedals, tuners, etc.Musical inspiration is delicate like a house of cards... one false move and it all falls down. It's also be like playing Jenga while drinking.
The analogy depends on if you like making card houses or drinking. In any event...
Have your gear organized and close to you. Get some easy to reach storage containers with drawers to keep all your loose accessories and spares together in one place.
Buy enough furniture so that everything has its own dedicated space and isn't piggybacked on another piece of gear... even something you don't use.
If at any point you find that you are not using something regularly...
Don't throw it out on the street, but store it away so that it's not a constant distraction. Simplify your studio and simplify your life.
Later when you have your gear ready to go, spend some time doing a "day-in-the-life" of your setup before running cables and cords. In other words, sit down and physically go through the motions of what you would do during a session.

For example, you sit down, grab your guitar, position a mic for vocals. Lay out your hardware so that cables don't overlap and get mixed up. All of your gear should be readily accessible without resulting in a tangled nightmare.
Get stands for your monitors, get stands for your mics, get stands for your guitars and keyboards, surge protectors with plenty of inputs.
This is a good place to spend some scratch... a bad layout will crush your creativity and your desire to spend time in your studio.
You don't need fancy professional custom studio furniture, but you do need to make sure it's all laid out nicely.
Choosing an Audio Interface
The Audio Interface is what bridges the gap between your music and the digital recording world in your home studio.
Although there are other options to choose from, the Audio Interface is the most straight-forward solution.
The main advantage of an Audio Interface is that you get your analog-to-digital converters, mic preamps, MIDI interface, and phantom power supply all in one unit.
Another great feature is that they connect to your computer via FireWire or USB interface, so you can have it in an easy to reach spot.
The decision of which AI you choose will largely come down to the number of mic preamp inputs you'll need. Are you gonna be a solo act with one vocal mic and one mic for your acoustic? - that's 2 right away.
If your lead guitar guy comes over to jam he'll probably want to mic his vocals as well plus plug in his electric axe to lay down some filthy epic riffs - that's 2 more.
And those are just the mono inputs - stereo inputs (such as those from a digital piano or synth) will use them up twice as fast.
They add up in a hurry so think this out for a bit. Try to have some foresight for expansion down the road. Having a few extra inputs can help avoid the headache of owning a piece of gear that can't do what you want.
You know that saying "Less is More"?? We'll in this case "More is More".
Check out the dedicated page for Audio interfaces for a more in-depth discussion. If you are ready to pull the trigger on an Audio Interface, check out the Audio Interface Buying Guide to compare several popular models.
As mentioned above, your Audio Interface will connect directly into your Digital Audio Workstation, so make sure the interface type (FireWire / USB) is supported by your machine.
The Digital Audio Workstation
It's time to put that computer of yours to good use there, Champ. Here is where we describe your Digital Audio Workstation (or DAW).
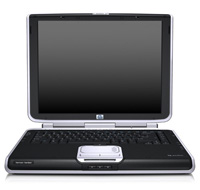
Although 'Digital Audio Workstation' is a generic term that could describe a wide range of equipment, for our purposes it is simply your home computer complete with digital audio Recording Software.
This software allows you to manage the different audio and digital signals received by your computer, and can either be purchased by itself or bundled with an Audio Interface.Often the software included is more than sufficient to get your feet wet and decide if this is something that you'd want to make a more significant investment in.
As you've seen with other software applications, having only the minimum requirements will make you want to set your machine on fire and toss it into oncoming traffic.
Avoid this by upgrading your current machine or going for a newer model. Check out the Digital audio Workstation page for more info.
Remember, there are 10 types of people in the world... those that understand binary - and those that don't.
Selecting Microphones

Depending on what you're recording, there are a couple different Microphone options. A high-end model will collect every nuance, but without the proper room acoustics, equally high-end preamps, and other components you won't hear the difference... so these are no good to us.
For around $150 bucks you can get a quality condenser mic. Since this is just to get started, I'd recommend a condenser over a dynamic mic.
A condenser mic will give you the flexibility to do vocals and instrument recording... just make sure you have Phantom power!
Recording Direct
Another giant savings in your basic home studio setup is the ability to record your instruments direct... or without the use of amplifiers.To do this you will need the services of a Direct Box. This takes a high impedance instrument level signal as an input and outputs a balanced mic level signal.
So for example, you would be able to plug your guitar into a Direct Box then (ready for this?) put it directly into your mic preamp input on your mixer or audio interface. Click above for a more in-depth explanation.
I use these all over my home setup: from my electric guitar, from my vocalist live FX pedal, and even from my digital piano.
Giving the Audio Interface / Mixer the signal type it is expecting will help reduce unwanted noise and make recording your instruments a breeze.
The Studio Cable Connection
 Now that the difficult decisions have been made, it's time to hook everything together so that the precious audio data can be delivered right where it needs to be.Check out the Studio Cable guide for more information on how to get just the right tools for the job.
Since we are not trying to buy gear for life "on the road" we can actually save money on cables. You'll need a lot of these (plus spares) so they could potentially eat up a lot of the budget.
How much you spend on these will depend on your tolerance for replacing worn out parts. If you are handy with a soldering iron, then you may not have a problem ever.
Otherwise if you don't want to be bothered, then it may be worth it to you to spend more and get a lifetime warranty.
Bringing it All Together
Now that you have all the gear and cables that you need... the next question is how does everything fit together.
Just like a sadistic jigsaw puzzle, getting all your equipment put together correctly can be a daunting task.
After all, there are no instructions for your unique setup right??
Well... not so fast.
Even though there are many many possibilities, chances are that your setup will fall into a few categories depending on what pieces of gear you have chosen for your studio.
Check out these Setup Diagrams to get some guidance on putting it all together. I know that between these examples and the knowledge you've gained along the way you'll be able to get you studio up and ready to rock.
Now all that's left if for you to start laying down those grooves, tunes, riffs, and licks that you've been keeping locked up inside all these years.
Victory Dance
Congratulations! Go ahead and do a little shimmy in your chair.At this point you should have the gear and knowledge you need to share your creativity with the world. There's no substitute for spending time and getting accustomed to your new studio gear.
Enjoy the journey of learning and discovery. If you are ready to add some more flexibility and capability to your rig, check out this site regularly.
Welcome to the world of digital home recording.
No comments:
Post a Comment